Introduction
What Is It?
- A Moleskine hack.
- An extreme Moleskine hack.
- A simplified GTD system (What system? See our GTD Introduction), with relatively little actual organising. May be useful if you fancy Doing GTD Without Doing GTD.
- A complete personal management system for those who’s needs aren’t too complicated.
- A rather over-the-top system for dealing with just the capturing and processing end of GTD.
Quick Overview

The rest of this post goes into quite a bit of detail, which makes it all sound a bit more complicated than it is.
It’s just a notebook, you make your notes from front to back, in the usual way. You have a bookmark of some sort to keep track of where you’re up to, so you can quickly open it and make a note. The only ‘clever’ part is that you have another bookmark, which marks the point at which you’ve dealt with everything in some way. Doesn’t matter if you’ve actually done the things, or just made a note of them elsewhere – as long as you’ve processed them in some way, so you don’t need to look at them again.
Normally, the second bookmark will lag a bit behind the ‘main’ one, and at least some of the stuff in-between needs doing or adding to a list somewhere else (maybe just some other pages in the same notebook). Anything left behind the second bookmark is pretty much ‘archived’.
If that sounds like something you’d get on with, read on for more details, and ideas on how to implement it.
Translations
I never thought anyone would want to translate one of my articles – I’m honoured that a couple of people have done just that, though…
There’s a Japanese Translation, done by Yuya Saito.
I found what seems to be a German translation of this article – no idea how good it is, because my German is pretty near useless. Thanks to Daniel for doing it!
Why?
I was finding GTD a bit much for various reasons, but didn’t want to stop entirely – I needed to be Doing GTD Without Doing GTD. This is the system I came up with in the end. It’s simpler than GTD, and wouldn’t scale to the sort of level that GTD will, but it works pretty well for me, so it seems reasonable to think it might work well for other people too.
Equipment Needed

Moleskine Pocket Reporter notebook. This is, after all, a Moleskine hack. Actually, any notebook could be used, I just find the Moleskine Pocket Reporter to be a good shape and size, and has all the right features. They’re relatively pricey, though, and aren’t easy to get everywhere, so you may want to substitute.
Pen or Pencil. Your choice. Needs to be pocketable, and work well for quick scribbled notes, but if you can find something you enjoy using, all the better. I started with the Staedtler Mars 780 Leadholder, but I’m now back to using my old favourite Cross ion. The Pilot G-Tec C4 is another good choice – writes very small, so you get more notes to the page. Makes my writing look even worse than usual, though.
Post-it Tags – available from most office supplies places, they’re little tags where the sticky part is clear, with a coloured non-sticky part – meant for adding tabs to books, much as we’re going to do shortly. Although I’ve specified colours for each use, it’s just to make explaining easier – use whatever colours you prefer.


Preparing
Page Template
Looks Like This
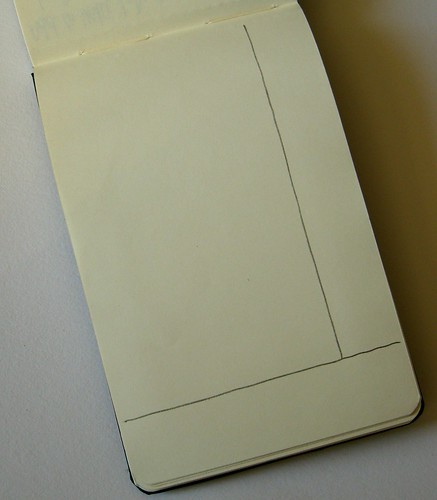
The basic page template is just a ruled line at the bottom, maybe two centimetres or three quarters of an inch from the bottom, then a line from the top of the page down to this line, about the same distance from the right hand edge. Doesn’t need to be exact, and you might prefer wider or narrower margins. Just see what you find works.
How To Mark
Trick I picked up years ago from one of my school teachers, for marking a ‘margin’ line on pretty much anything with some thickness to it – he used it for marking wood for cutting, but it works just as well on a notebook...
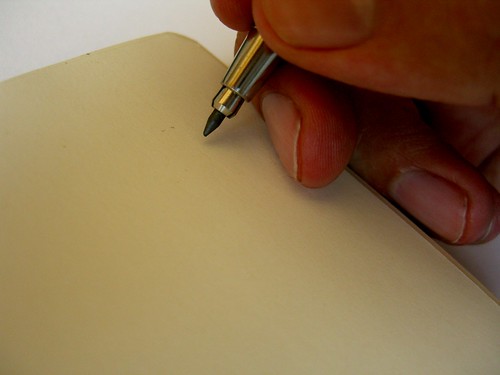
- Hold your pen or pencil in hand as usual, between thumb and first two fingers.
- Rest your second finger on the page.
- Press the first knuckle of your third finger (ring finger) against the edge of the pad.
- Slide down the page, using fingers as a guide – do it once or twice with the pencil just above the page, to get the idea, then lower the pencil and draw the line.
- The result won’t be as perfect as a ruled line, but not far off, and you can do it anywhere without needing a ruler. Careful of paper cuts.
Why a Template?
The main section is for your notes and scribbles. Drawings, even, if you’re so inclined. The margin on the right is a space for notes added later – maybe actions arrising from the things on the left, or follow up clarifications.
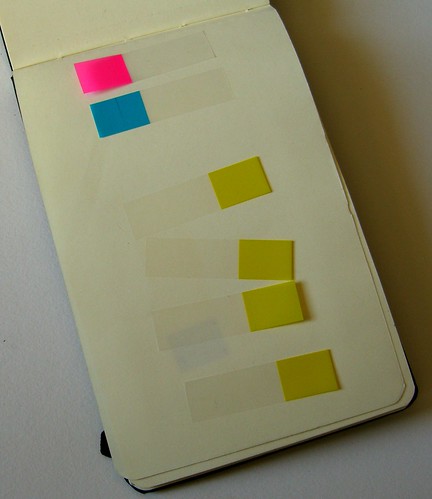
The section at the bottom is for two things – space for the tags, and a space for titles for active pages. If a page is just for capturing quick notes and scribbles, it will be left blank, and just used for the tags. If a page is brainstorming or mind mapping of an idea, event or project, a title can go in the middle of the bottom section, where the tags won’t obscure it. Remember, the sticky part of the tags is clear anyway.
Titles at the bottom seems a bit odd, but it does seem to work, especially with the reporter style notebook and the tags.
Mixing with Other Ideas
The same template idea can be mixed in with other stuff…
- Leslie Herger, for example, uses a system with two pages based on the PigPogPDA idea, followed by two pages of general ideas and notes. The block of four pages tend to get used up around the same time, then she moves on to the next block.
- Peter at Getting (Some) Things Done …Eventually has mixed parts of the PigPogPDA with other things very effectively – adding the other parts of GTD to sections of the notebook.
- This system at azazil makes a system from a Moleskine diary, using ideas from this article, and hyalineskies’ excellent system. Both of these have taken some ideas from the PigPogPDA, but built some great stuff on top of it, and made a much more complete system.
- I later did something similar to the PigPogPDA, but using a Filofax. The ‘active’ marker is the ‘today’ plastic ruler, and anything that would be behind the ‘processing point’ gets taken out and archived elsewhere. My GTD-style context lists, and Someday/Maybe stuff just go in different sections.
Stock Up on Tags
The last page in the Pocket Reporter is thick card – use this to stick spare tags on – maybe one spare each of pink and blue, and a good stack of yellows. They peel off this page easier than the other pages.
##Date The Edge
No, not the fella from U2. Use a Sanford Sharpie or similar marker to mark the date you start the notebook on the edge of the pages. When you’re done with this one, you’ll mark the end date on it, and they’ll all stand in a line on your shelf looking impressive ;)

Using
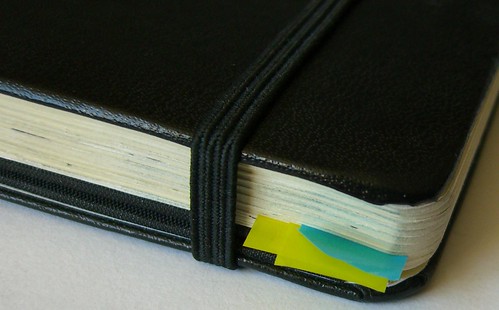
Blue and Pink Tags
These mark out the boundaries of your active capturing area. I use a blue tag for the processing point (closest to the front of the book), and a pink tag for the collection point (closest to the back of the book).
Blue Tag – Processing Point. Anything before this point has been processed, and you don’t need to refer to again – unless it has a yellow tag to mark it as active. I keep this one stuck on the left hand side, which makes it stand out better.
Pink Tag – Collection Point. This is where you need to note down any new ideas. Sometimes, there will be notes beyond this point, but only when you’ve needed a full page for something. I keep this one on the right hand side, so it’s the only non-yellow thing on its side. You might want to keep all yellow tags on the left, so you can find the collection point by feel, and don’t have to look for colours before making a quick note.
Obviously, you can use whatever colours you like for this. I’ve picked yellow for the active markers, because they’ll be easiest and cheapest to buy, and blue and pink because they stand out well against the yellow and each other.
Active Tags
Anything that’s currently being worked on gets a yellow tag. I find it best to keep them all on the left side – that way, the pink tag can be found easily, because it’s the only tag on that side. Good for when you need to make a note of something quickly. See the ‘Variations’ note further down the page – I’m currently using a slightly different trick for active pages, which seems to work better than the yellow tags.
What Gets an Active Tag?
Anything that’s active. If you’re planning an article, or a party, or you’re working on a list of people you’ll need to tell about something, or a list of things you need to do this weekend, or…
You get the idea. Anything you’re still working on that has a page of its own. Single items should be moved into a list before getting a yellow tag.

Can Active Tags be Before the Blue Tag?
Yes. If you’ve processed all the notes past the point of that page, as long as there’s an active tag on it, the blue marker can move forward beyond it. The yellow tag keeps it active, and lets the blue tag move beyond the page.
Can Active Tags be Ahead Of the Pink Tag?
Yes. The Pink tag is your current capture point – if you’re only halfway down a page, and want to start working on a list, or mind mapping something you’re intending to do, you just move forward to a new blank page. The capture point doesn’t have to move forward, though, until the page it’s on is finished. In this case, you’ll have active work, with a yellow tag, further towards the back of the book than the pink tag. That’s ok.
Alternative to Active Tags – Page Numbering with an Index
I used a variation on this in my second PigPogPDA, and it seemed to work better for me. Rather than having the yellow tags, I started it by numbering all the pages, but skipped the first page (the first one after the card page, that is. The one that sticks to the card page a bit). The first page, I used as a kind of contents page for the pages that would otherwise have had yellow tags on them. So when I want to do a bit of brainstorming about something, or make notes on a specific subject, I scribble a title in the bottom part of a template page, then write the page number and the title on the first page. Things can be crossed out when they’re no longer active.
One page should be enough for the contents, continuing on the second side if needed, but you can always leave a second page spare at the start if you’re concerned about running out of space.
The advantages are…
- Less tags getting in the way – all those yellow tags are a bit of a mess.
- Faster to find a page. Once you’ve got a few active pages on the go, even if it’s not a lot of them, it can take a while to find the one you’re looking for among all the yellow tags. This way, you open the first page, look up the page you want, and flick to it.
- Quick reference to all active pages, making it easier to review what you’re working on.
- The numbers are in the very bottom right corner of each page.
Capturing

Capturing is pretty simple, just as it should be. Open up a the pink tag, and make your notes. Draw a line across between items, all the way to the edge. The right hand side margin can then be used to tick off items that are done, or make little notes of actions coming from that note.
Processing
Processing starts from the blue tag (closest to the front of the book). You check each page, and if there’s anything actionable in it, you need to either do it, or clarify what it is and add it to an active list somewhere. That somewhere can be another page further forward in the book, or it could be a to-do list somewhere completely different.
If you’re just capturing with this system, the actual to-do list could be in a copy of Outlook, or index cards, or whatever other system you like.
If this is your entire system (it is for me), you just make lists as and when you need them further forwards in the book. If you’ve got several things noted down that you need to do this weekend, make a page for Things To Do This Weekend, and put these on the list. Then you can mark the items off. When each item on a page is marked off, move the blue tag forwards. Skip any active pages with yellow tags – they’re already marked as active, and when they stop being active, we’ll process them before removing their yellow tag.
Ideally, the blue tag should meet the pink tag fairly regularly – that means you’re all up to date with things. If they’re too far apart too often, you’ve probably got too much stuff between them that’s outstanding, and need to either start doing things more, or you might need a better Productivity) system. Or if you’ve got mostly crossed out items, with just a few that you’ve not dealt with clogging things up, you can move them forward…
Moving Things Forward
Sometimes, there’ll be something sticking the blue tag from moving forward, because it doesn’t really belong in a list, but you can’t (or can’t be bothered to) do it. Feel free to just copy it to your current capture point, and continue moving the blue tag forwards. If there’s a few of them, you could always collect them together in a ‘Stubborn Items’ list. You don’t want to build up too many active items, though. They’ll all need copying forwards to a new book when you reach the end of this one, or you’d have to carry two books around.
Reference Stuff
Personally, I keep reference stuff elsewhere – I need that stuff on a computer where it’s searchable and can be archived and backed up safely.
If you really want reference stuff mixed in with this system, I’d probably just get another colour of tags, and tag reference stuff with that. The blue tag would, obviously, just move forwards past them.
Archiving
Simple trick – mark the start and end dates of the notebook on the side, and they’ll all line up on a shelf with the dates showing.
Other Tricks
The elastic on the Moleskine notebook can just about hold the tip of your chosen pen or pencil, keeping them together in you pocket.
The back pocket in the notebook is just wide enough for credit cards and business cards, and it will also hold index cards and paper money quite nicely. If you can manage with only a few items, you might be able to replace your wallet – I have.
Clip your mobile phone under the elastic too, and you’ve got yourself a PigPog Communicator.
Number the last ten pages backwards – 1 on the last page, then 2, and on inwards. That way, when you hit the number 10 when using new pages, you’ll know you’ve only got ten pages to go before needing a new PDA.
When starting a new book, mark up a page halfway through first, and make a note at the top of it to buy another Pocket Reporter. When the pink tab reaches that point, you’ll already have a reminder in place to replace your PDA well before it runs out.